This month, our AI marketing tool is excited to introduce several new and enhanced features aimed at boosting cross-channel engagement, simplifying content creation, and providing deeper insights – all designed to make it easy and seamless to engage with your customers.
04.11.24
April Updates
Web Personalization Within Journey Builder
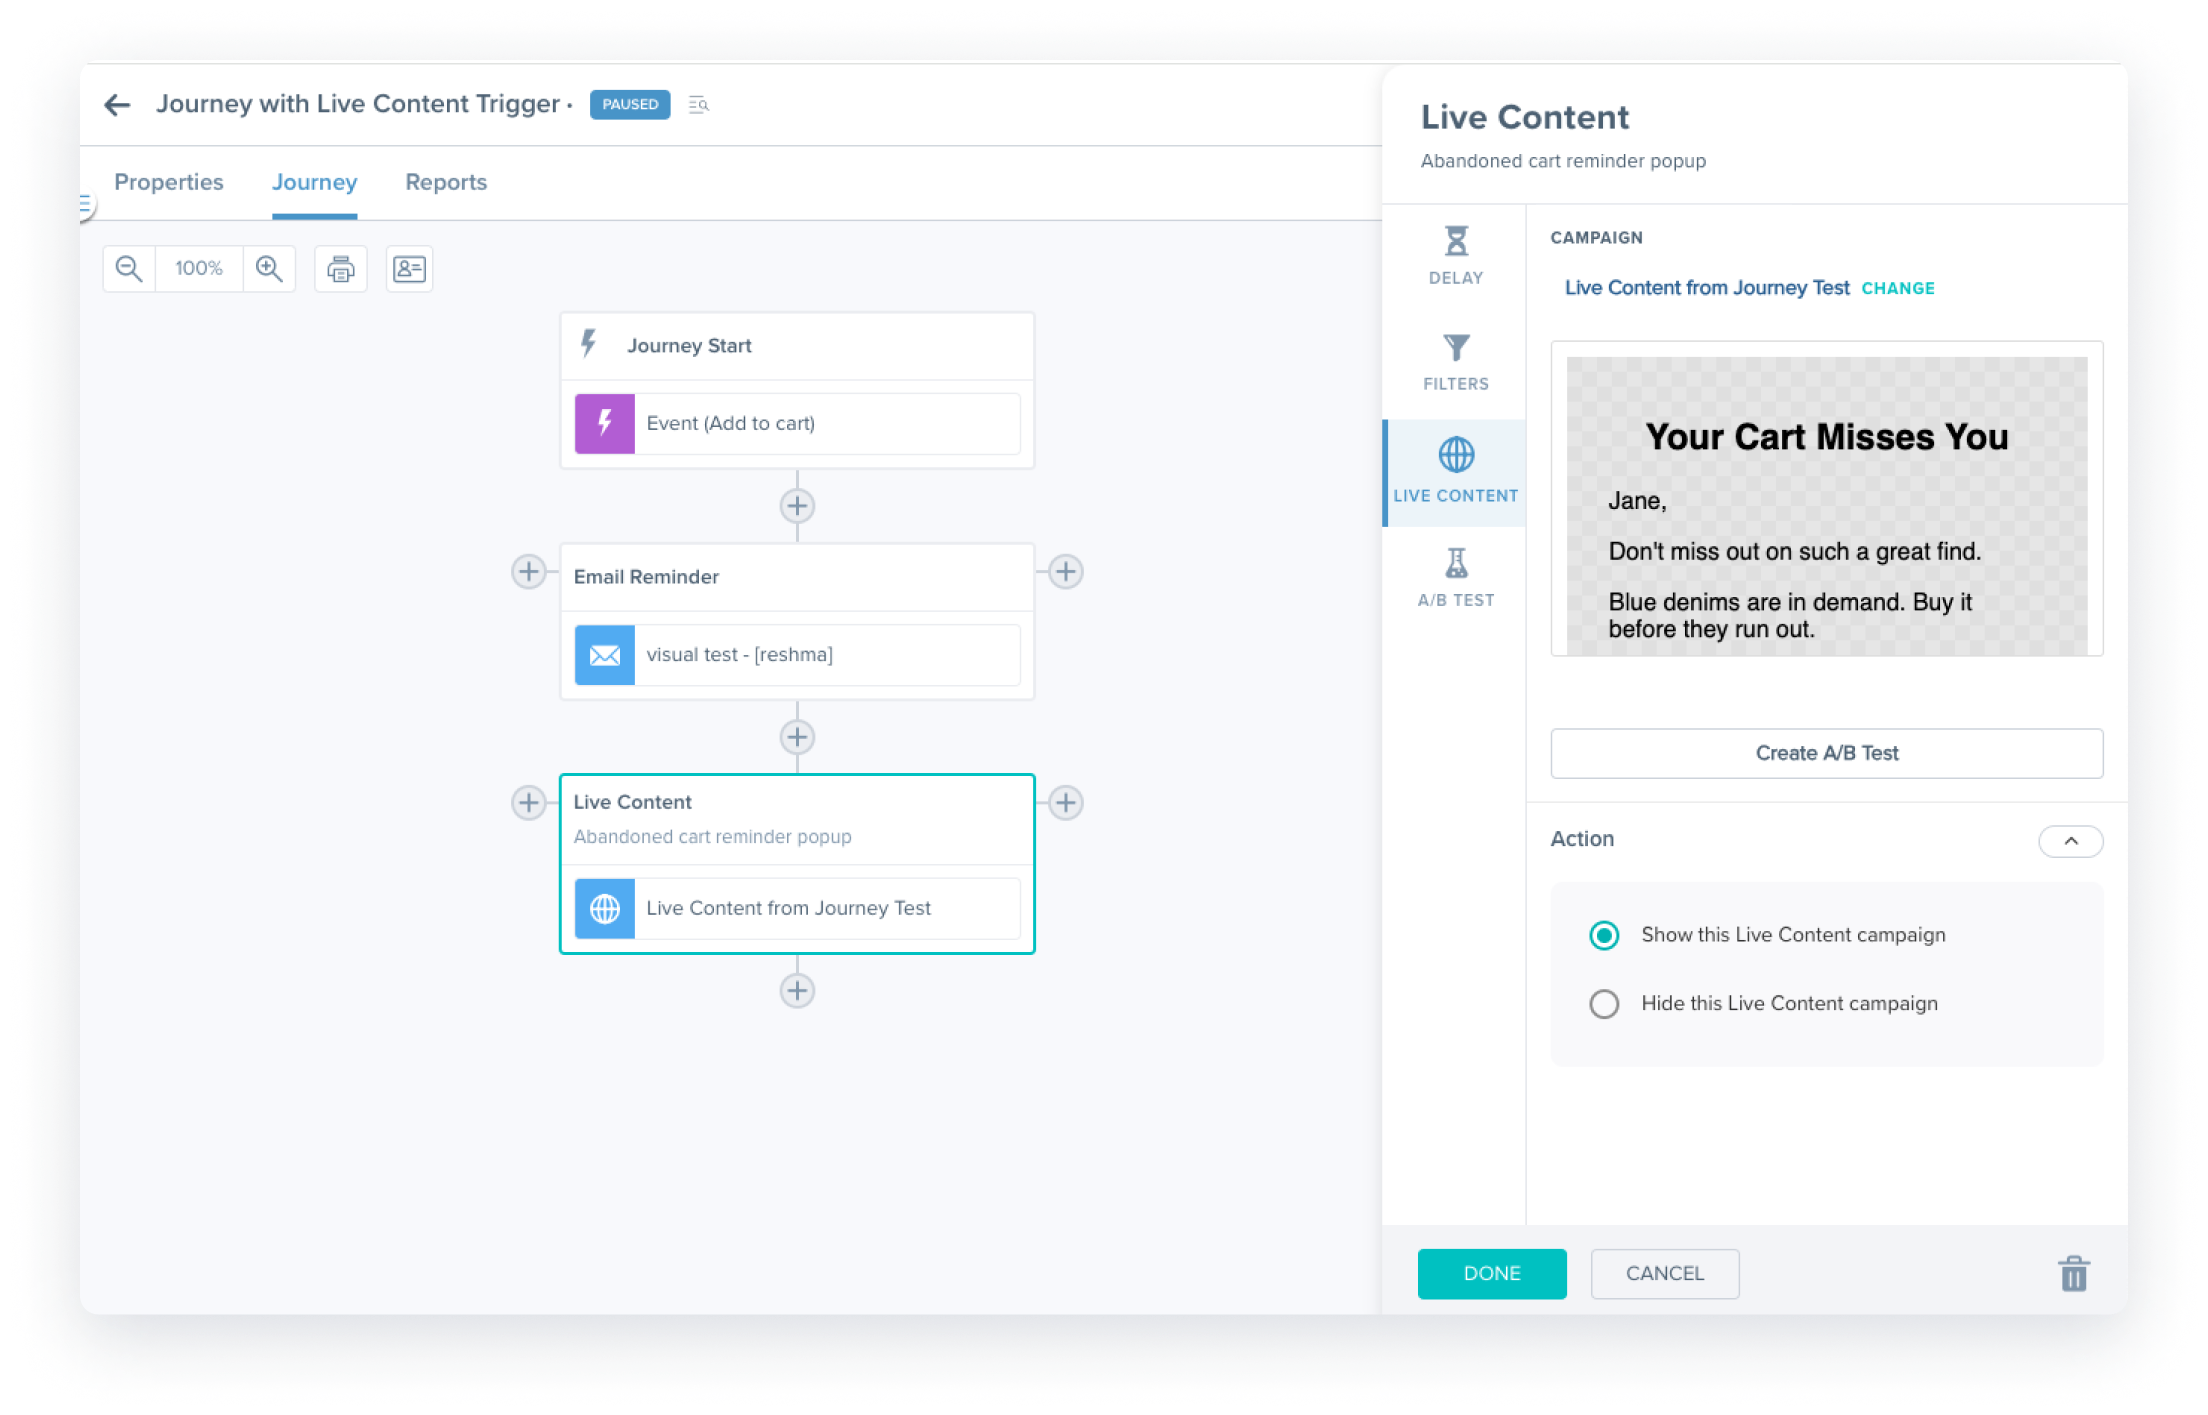
You can now orchestrate web personalization (Live Content) directly within the Journey Builder. This enables you to seamlessly integrate rich web experiences with other channels like email and mobile, all within a single campaign for enhanced cross-channel engagement. For instance, if a user abandons their checkout journey midway, you can trigger a reminder through an ‘abandon cart’ email and simultaneously entice them with the items waiting in their cart through a live content popup on your website—all within the same journey. This is key for creating seamless and cohesive journeys that increase the likelihood of driving a conversion.
Set this up in 2 simple steps:
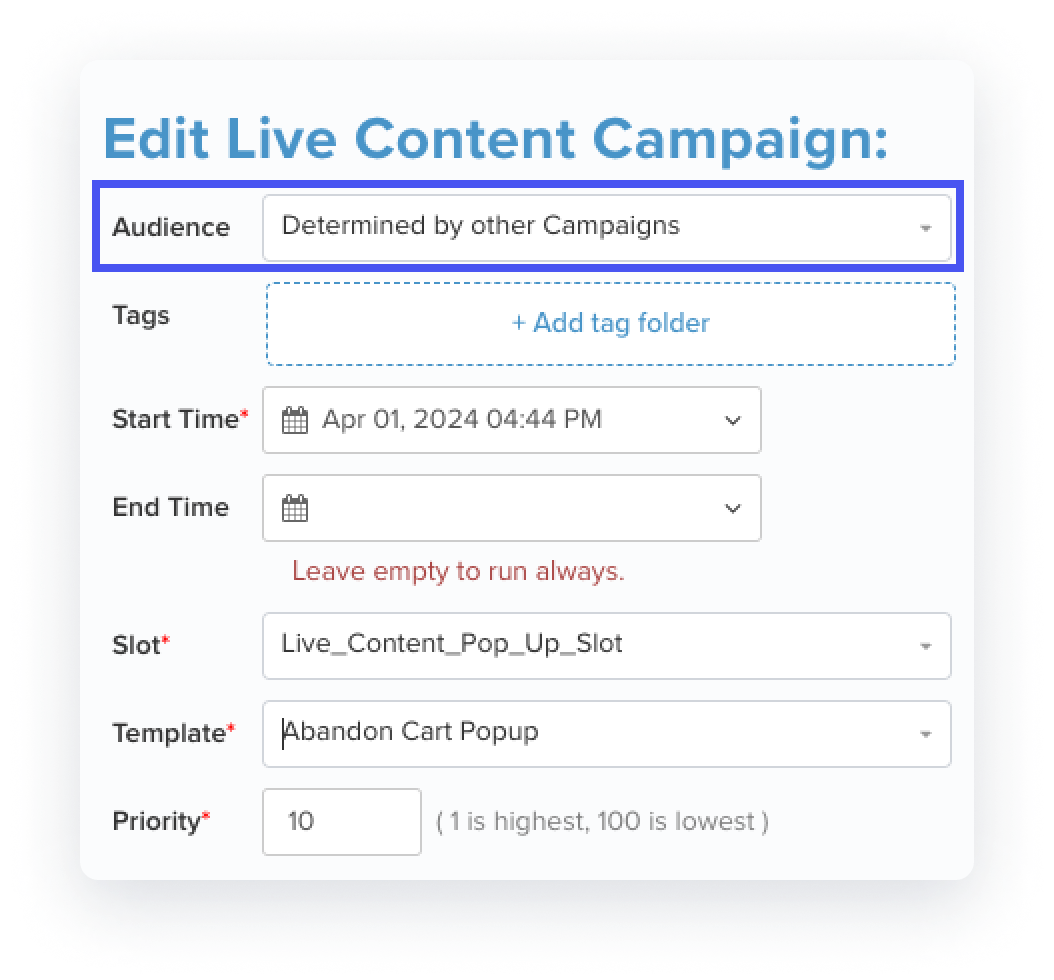
- Live Content Campaign Setup: Begin by creating a new Live Content campaign. Select ‘audience’ = ‘determined by other campaigns’, choose the slot and template, and launch it.
- Integrating into the Campaign Journey: When adding a new trigger, you’ll find the option for a ‘Live Content’ trigger under the ‘Messaging’ section. Simply select this trigger and add it to any step in your journey. Configure the trigger to choose the Live Content campaign you set up in step 1 and select whether to show or hide the Live Content to the user. Now, your website can dynamically personalize content based on a user’s interaction with messages across various channels.
- Tip: Utilize the journey builder’s left → right ordering to prioritize different live content campaigns on your website. Whether they target the same slot, multiple slots, or no slot at all (e.g., popups and banners), you can effortlessly manage their priority.
- Note: Launching a live content campaign configured to receive its audience from other campaigns (step #1) alone won’t suffice. You must also proceed with step #2, incorporating the live content campaign into a journey to display (or hide) the content accordingly.
Live Content Studio Enhancements
With our enhanced Live Content Studio, creating beautiful web content is now effortless with our intuitive visual editor – no HTML needed. Discover brand-new content types, including pop-ups, banners, and landing pages, along with quick-start templates to easily get started (see below). Our enhanced Live Content Studio now offers a best-in-class experience that mirrors the Email, Push, and other messaging studios to which you’re already familiar.
- Properties: This tab contains your template settings like dimensions, tags, and more.
- Content: This is where you design your template.
- Data: This is where you add additional data elements like recommendation schemes that you can use to customize the content in your template
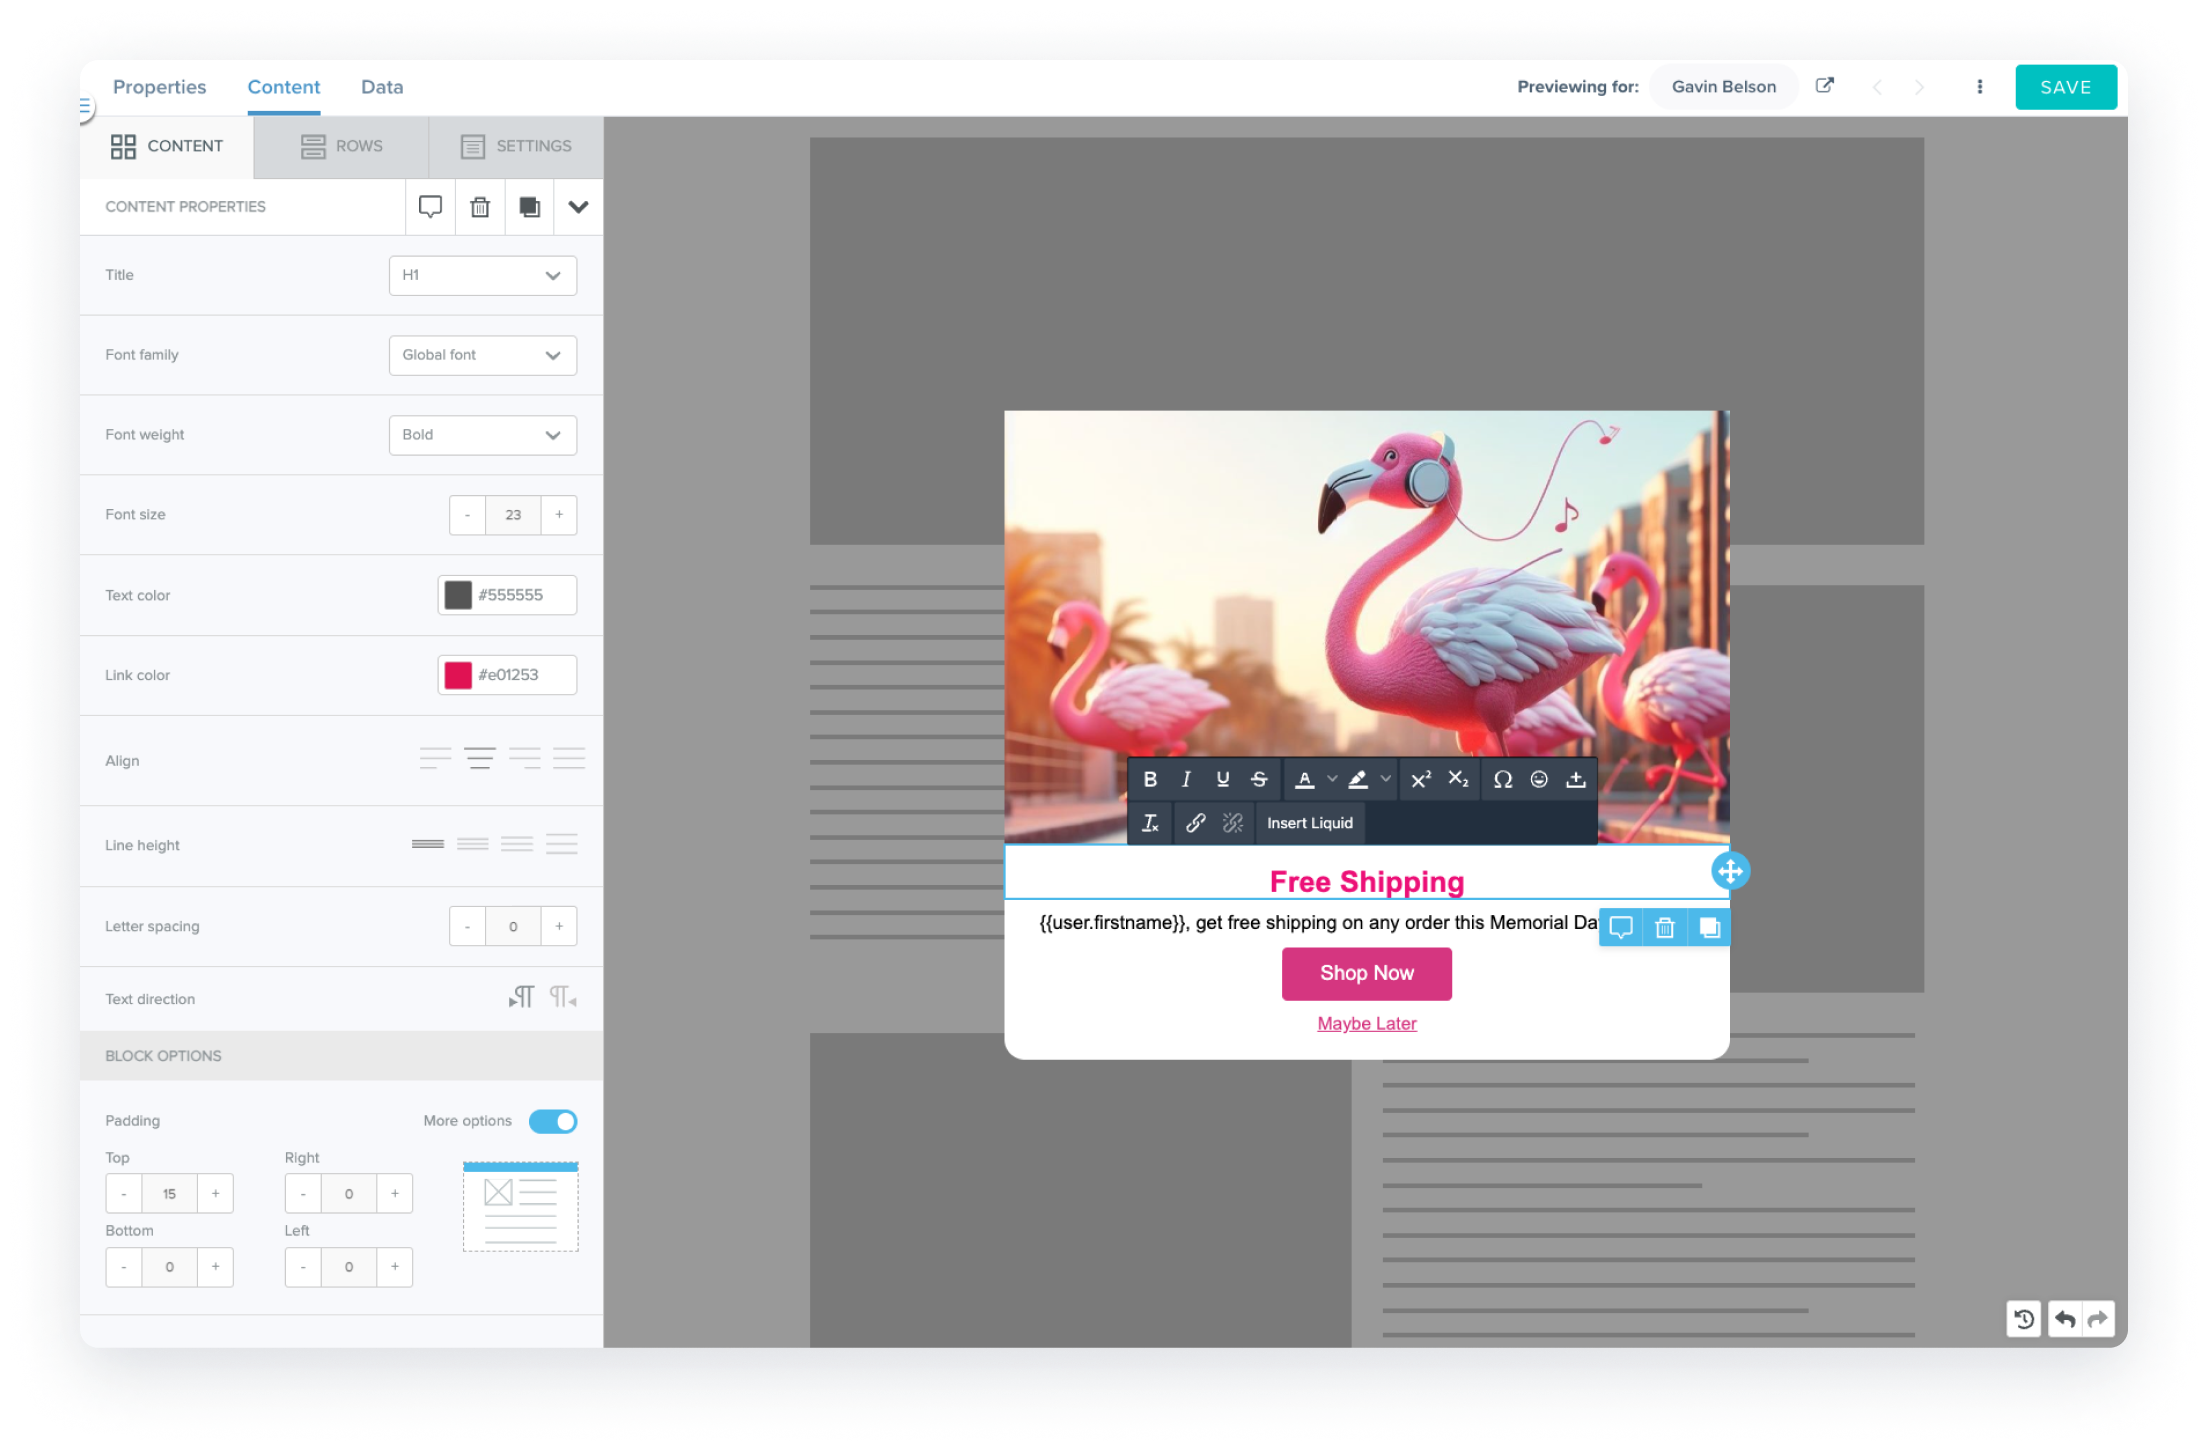
- Popups: These versatile windows are ideal for grabbing users’ attention with promotions, coupons, or gentle reminders when a user abandons their cart, enhancing engagement and encouraging action.
-
- How to Create: To create a ‘popup’ template simply click on the +TEMPLATE button, select ‘Visual Template’ (or ‘HTML Template’), then choose ‘Popup’ in the subsequent screen. Then, add a name to your template and customize it to fit your brand’s style.
- How to Use: To use the popup template you just created in a live content campaign, you will need to create a slot with format = ‘Popup’.
- Banners: Capture your audience’s attention with eye-catching banners positioned along the top margin of your webpage. Perfect for announcing website updates, product launches, or special promotions.
-
- How to Create: To create a ‘banner’ template simply click on the +TEMPLATE button, select ‘Visual Template’ (or ‘HTML Template’)then select the type as ‘Banner’. Then, add a name to your template and customize it to fit your brand’s style.
- How to Use: To use the banner template you just created in a live content campaign, you will need to create a slot with format = ‘HTM’L, width = 0, and height = same as that of your banner template.
- Landing Pages: Drive conversions and boost engagement with tailored landing pages that guide users through their journey seamlessly. These standalone web pages are where users “land” after clicking on an email, ad, or other digital location. Ideal for promoting new products, driving app downloads, or encouraging newsletter sign-ups.
-
- How to Create: To create a ‘landing page’ template simply click on the +TEMPLATE button, select ‘Visual Template’ (or ‘HTML Template’) then select type as ‘Landing Page’. Then add a name to your template and start customizing.
- How to Use: To use the landing template you just created in a live content campaign, you will need to create a slot with format = ‘Landing Page’.
Insights Reports Enhancements
To empower you with faster, more effective analysis, we’ve rolled out several enhancements to our “Insights Reporting” feature:
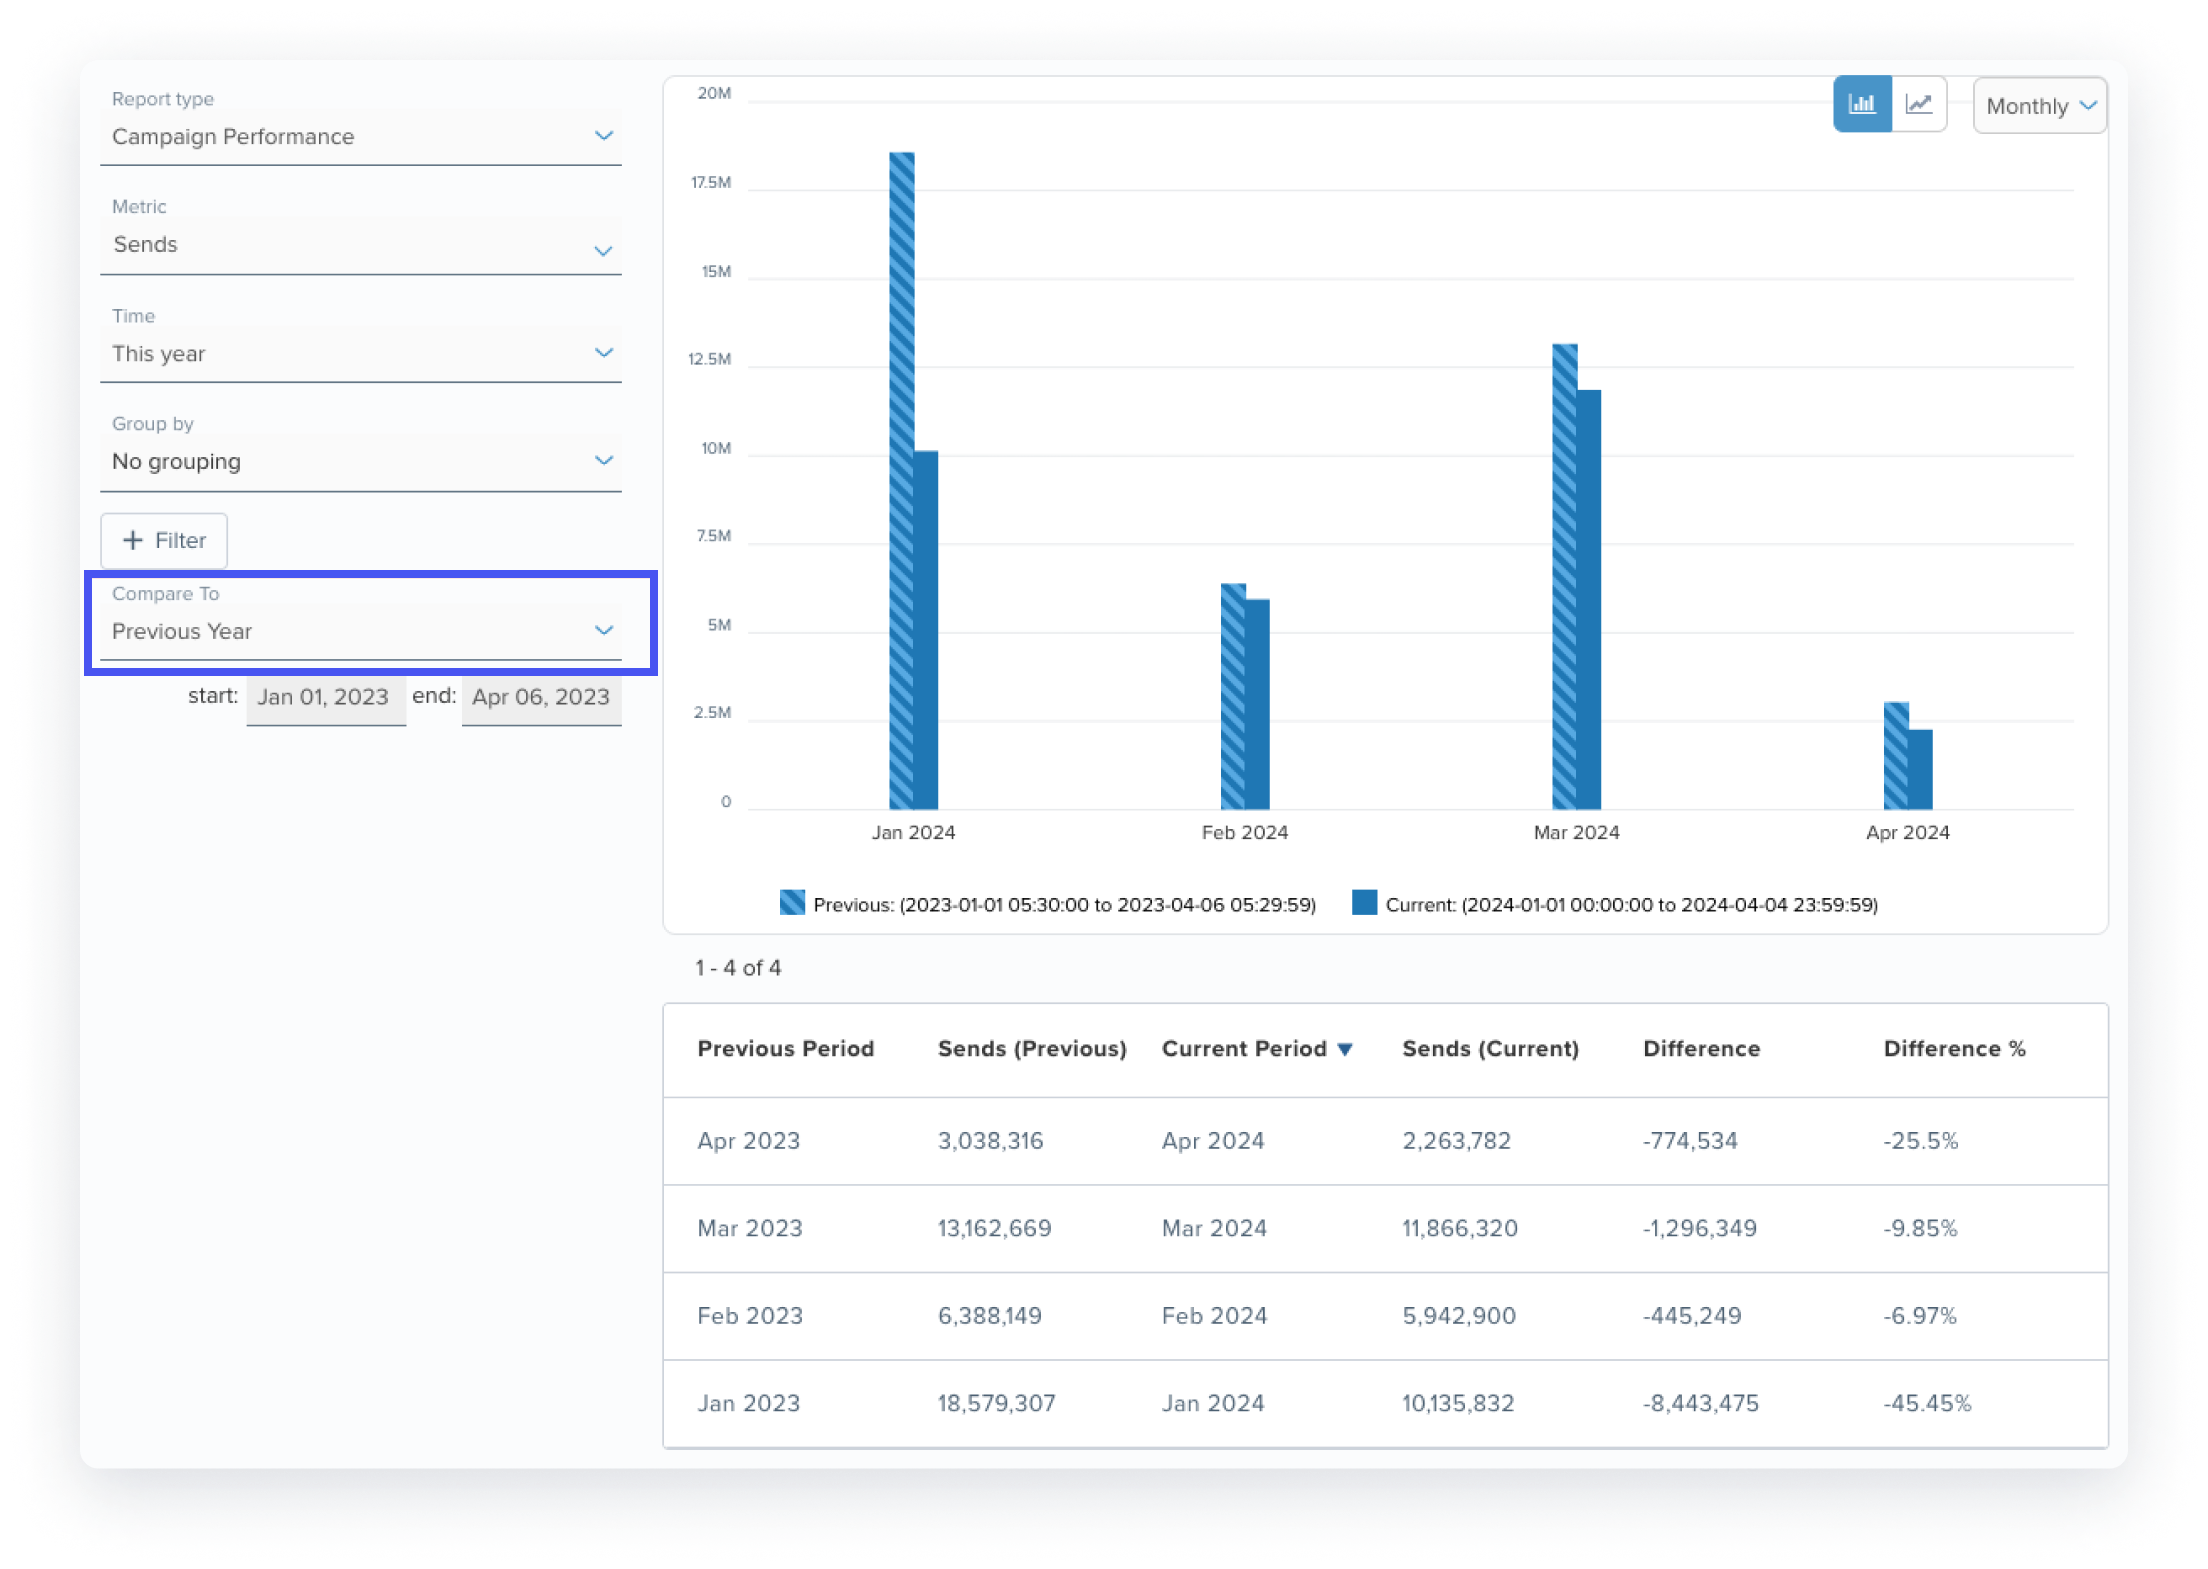
1. Default Time Periods for Comparison: Effortlessly compare campaign performance with the addition of two new default time periods: comparing to the previous month and comparing to the previous year. This accelerates your analysis by eliminating the need for manual calculation within the ‘moving time window’.
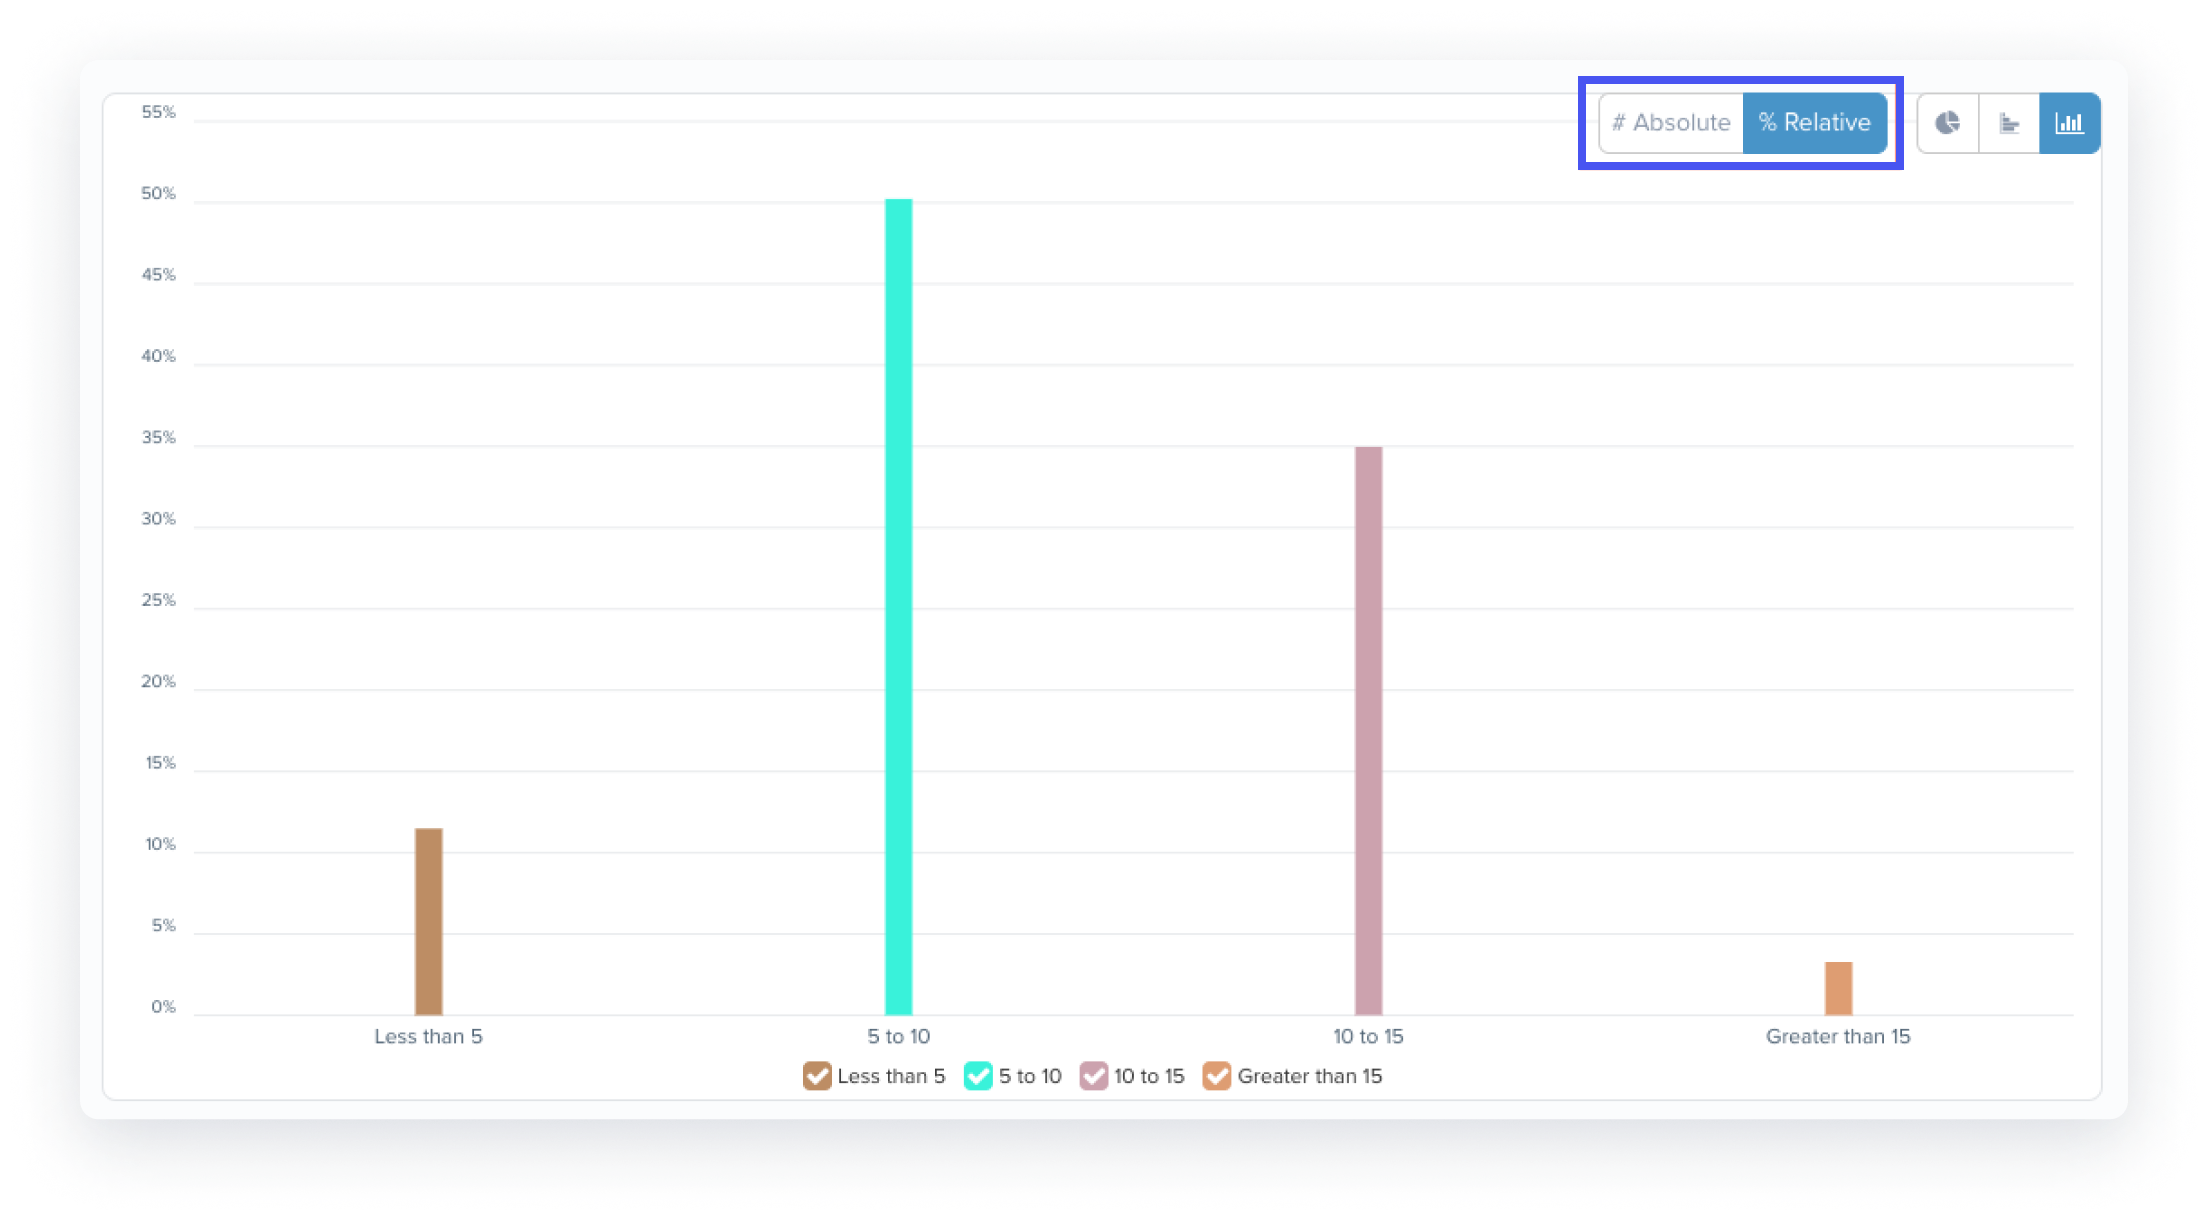
- View Percentage Values: Gain deeper insights by viewing percentage breakdowns, in addition to absolute numbers when grouping reports by attributes. For example, understand what percentage of your customer base consists of Millennials or gauge the proportion of email sends to Gmail users, empowering more precise decision-making.
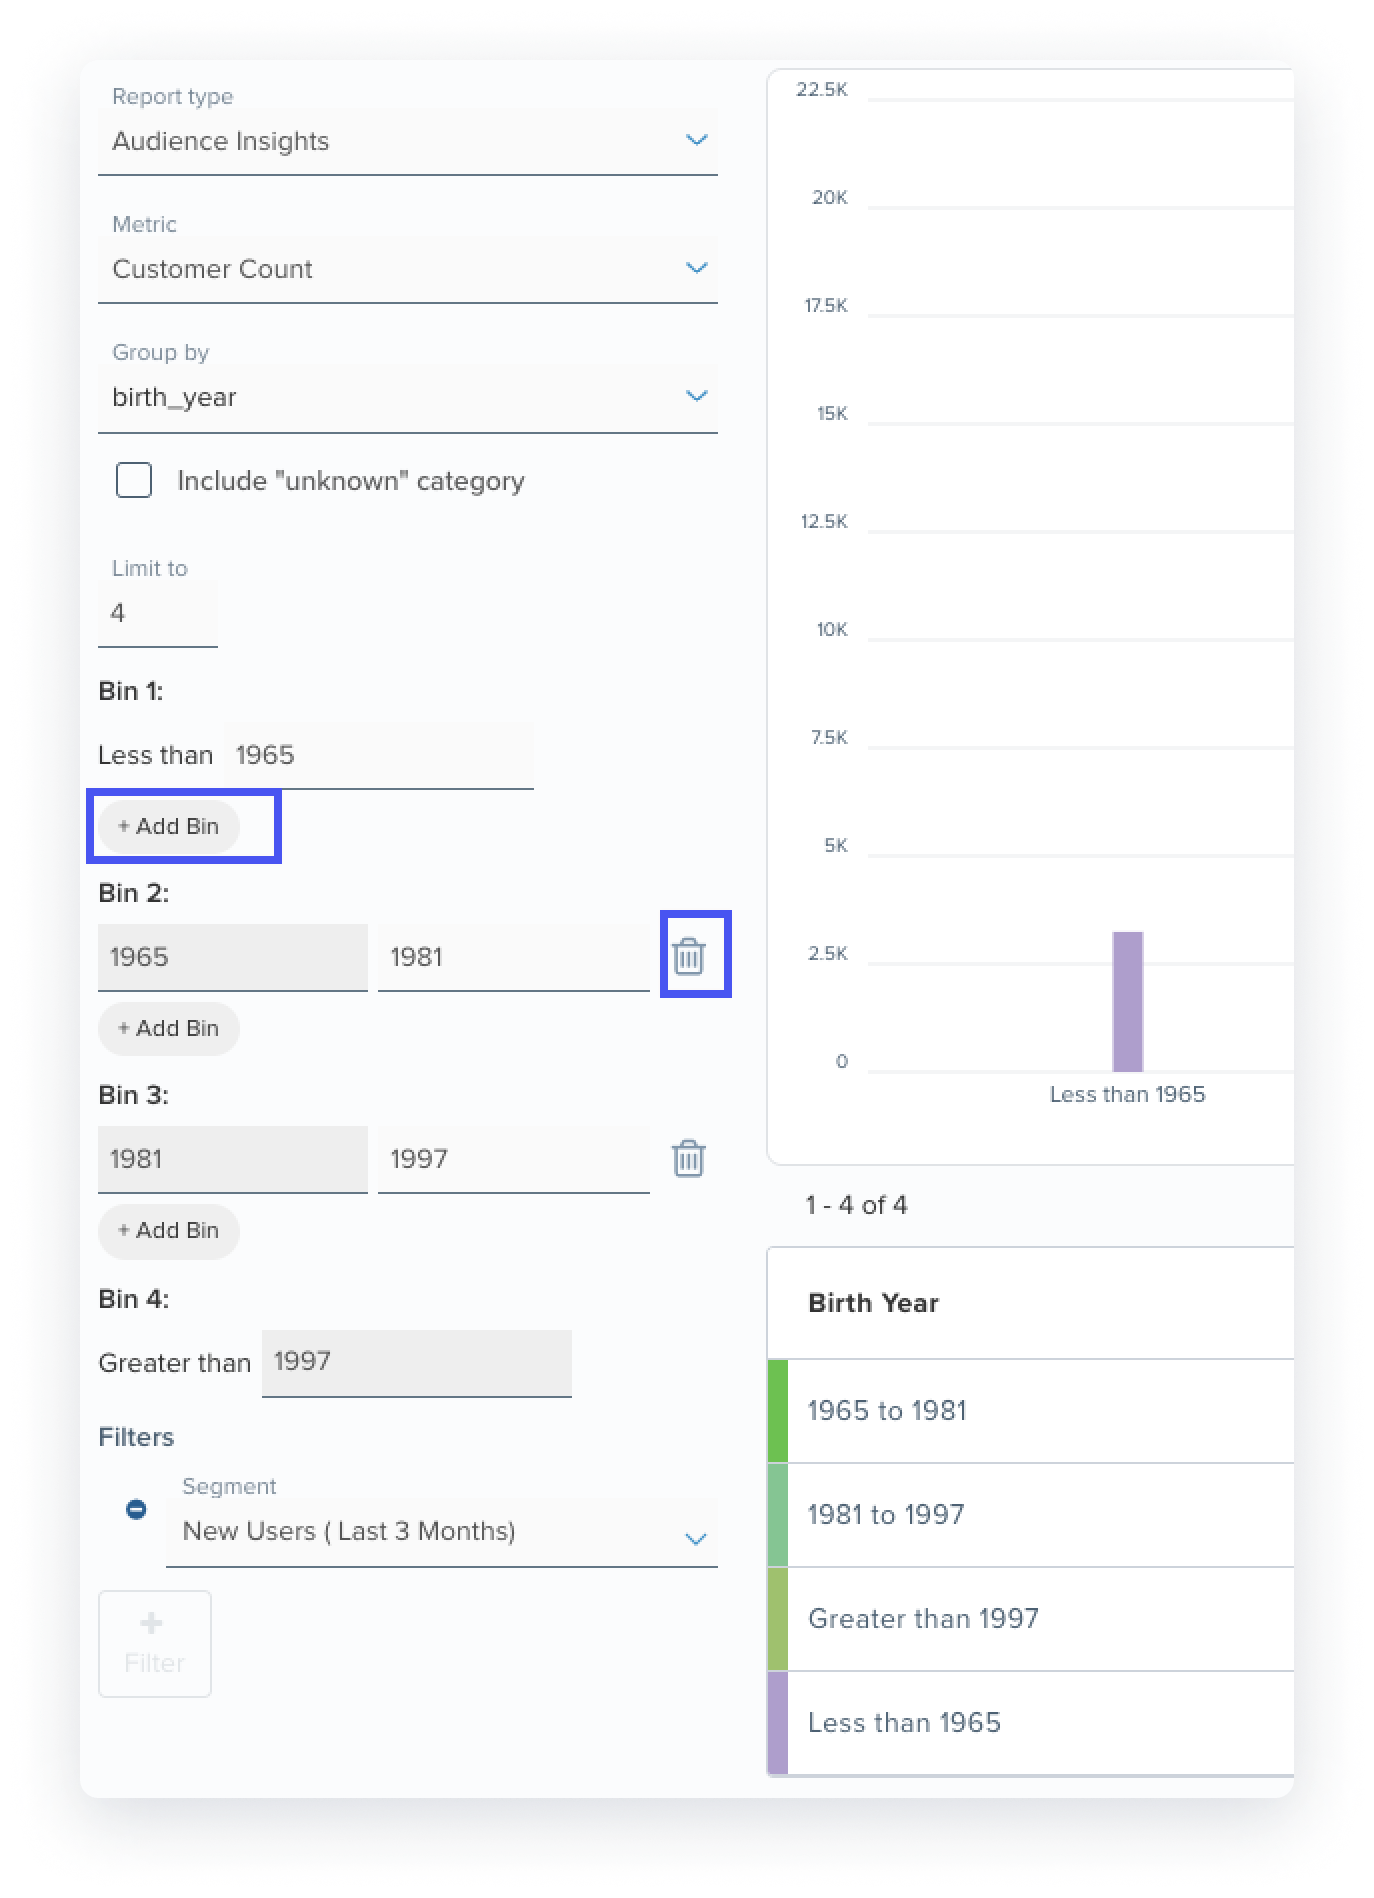
- Add and Delete Bins in Audience Insights Reports: When analyzing your customer or event data based on numerical or date-type customer attributes, you’ll now find it easier to refine your analysis. With our new ‘add’ and ‘remove’ buttons, effortlessly insert new bins between existing ones or remove unnecessary bins with a simple click.
Improved Customer Import Experience
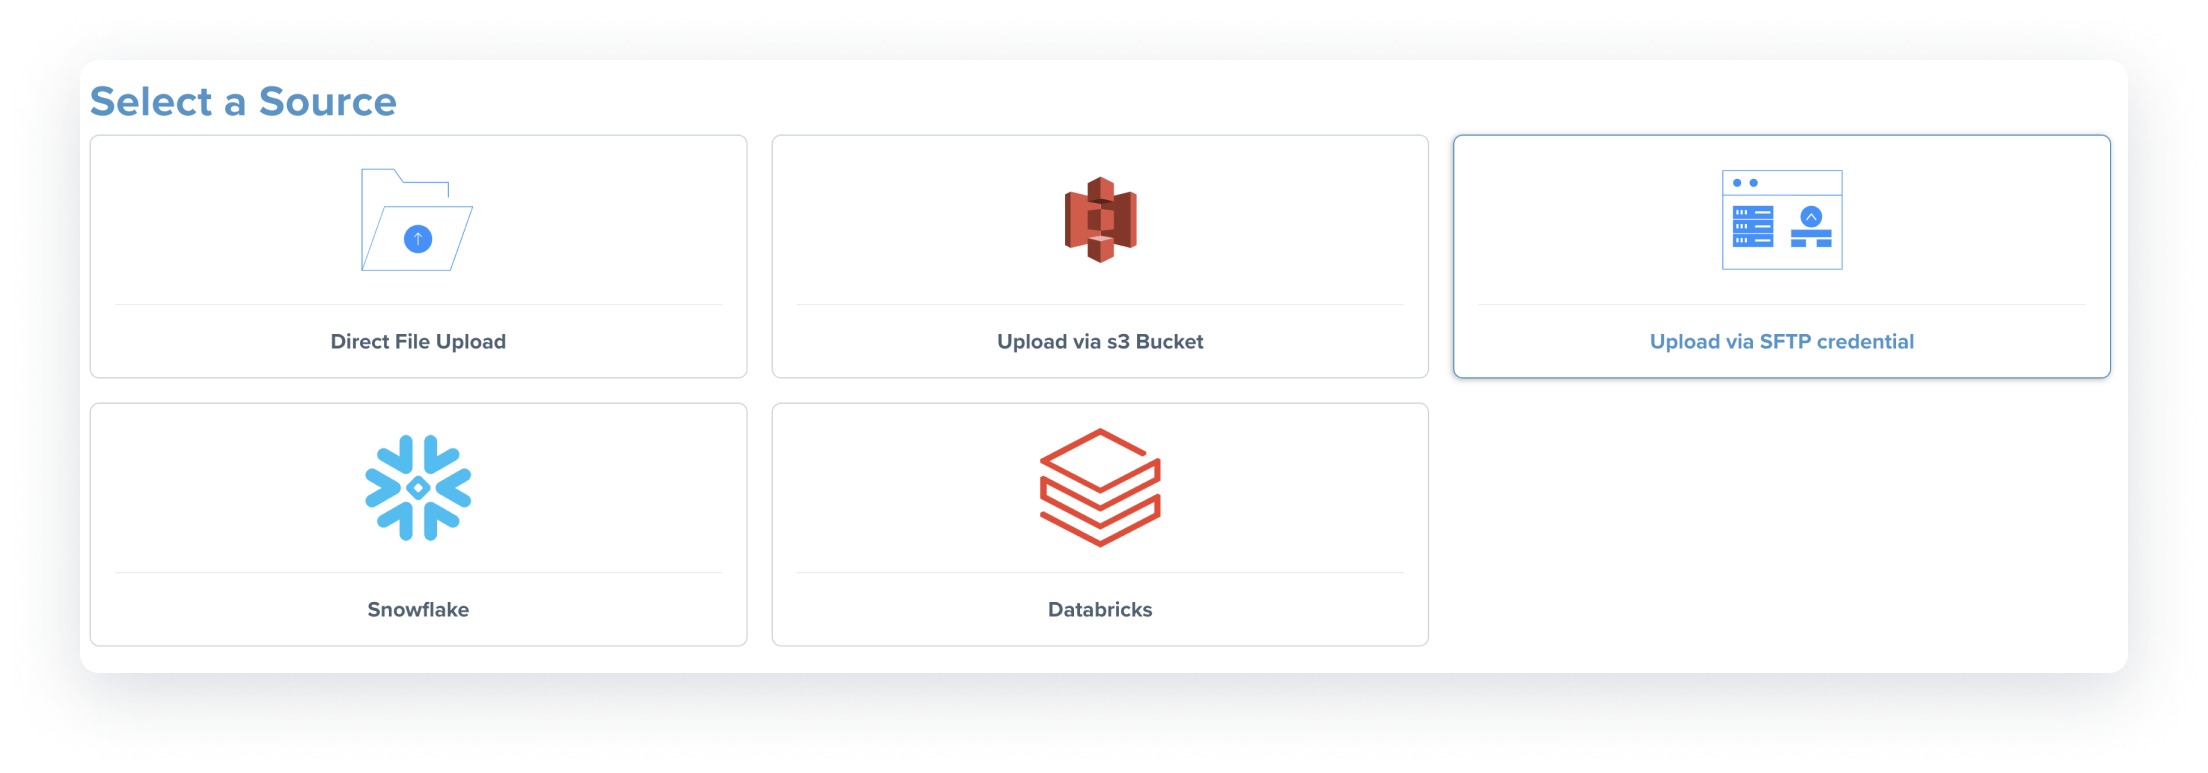
We have updated the Customer Import experience to make it even more intuitive, versatile, and reusable. With this upgrade, you will be able to:
- Import customer profiles from SFTP sources, improving the breadth of integration options
- Use adapters for S3 and SFTP customer imports for improved reusability
- Edit import tasks, eliminating the need to create new tasks for each change
While these benefits are automatically available for all new tasks, we recommend switching your existing import tasks to the new Customer profile import tasks to leverage these benefits.
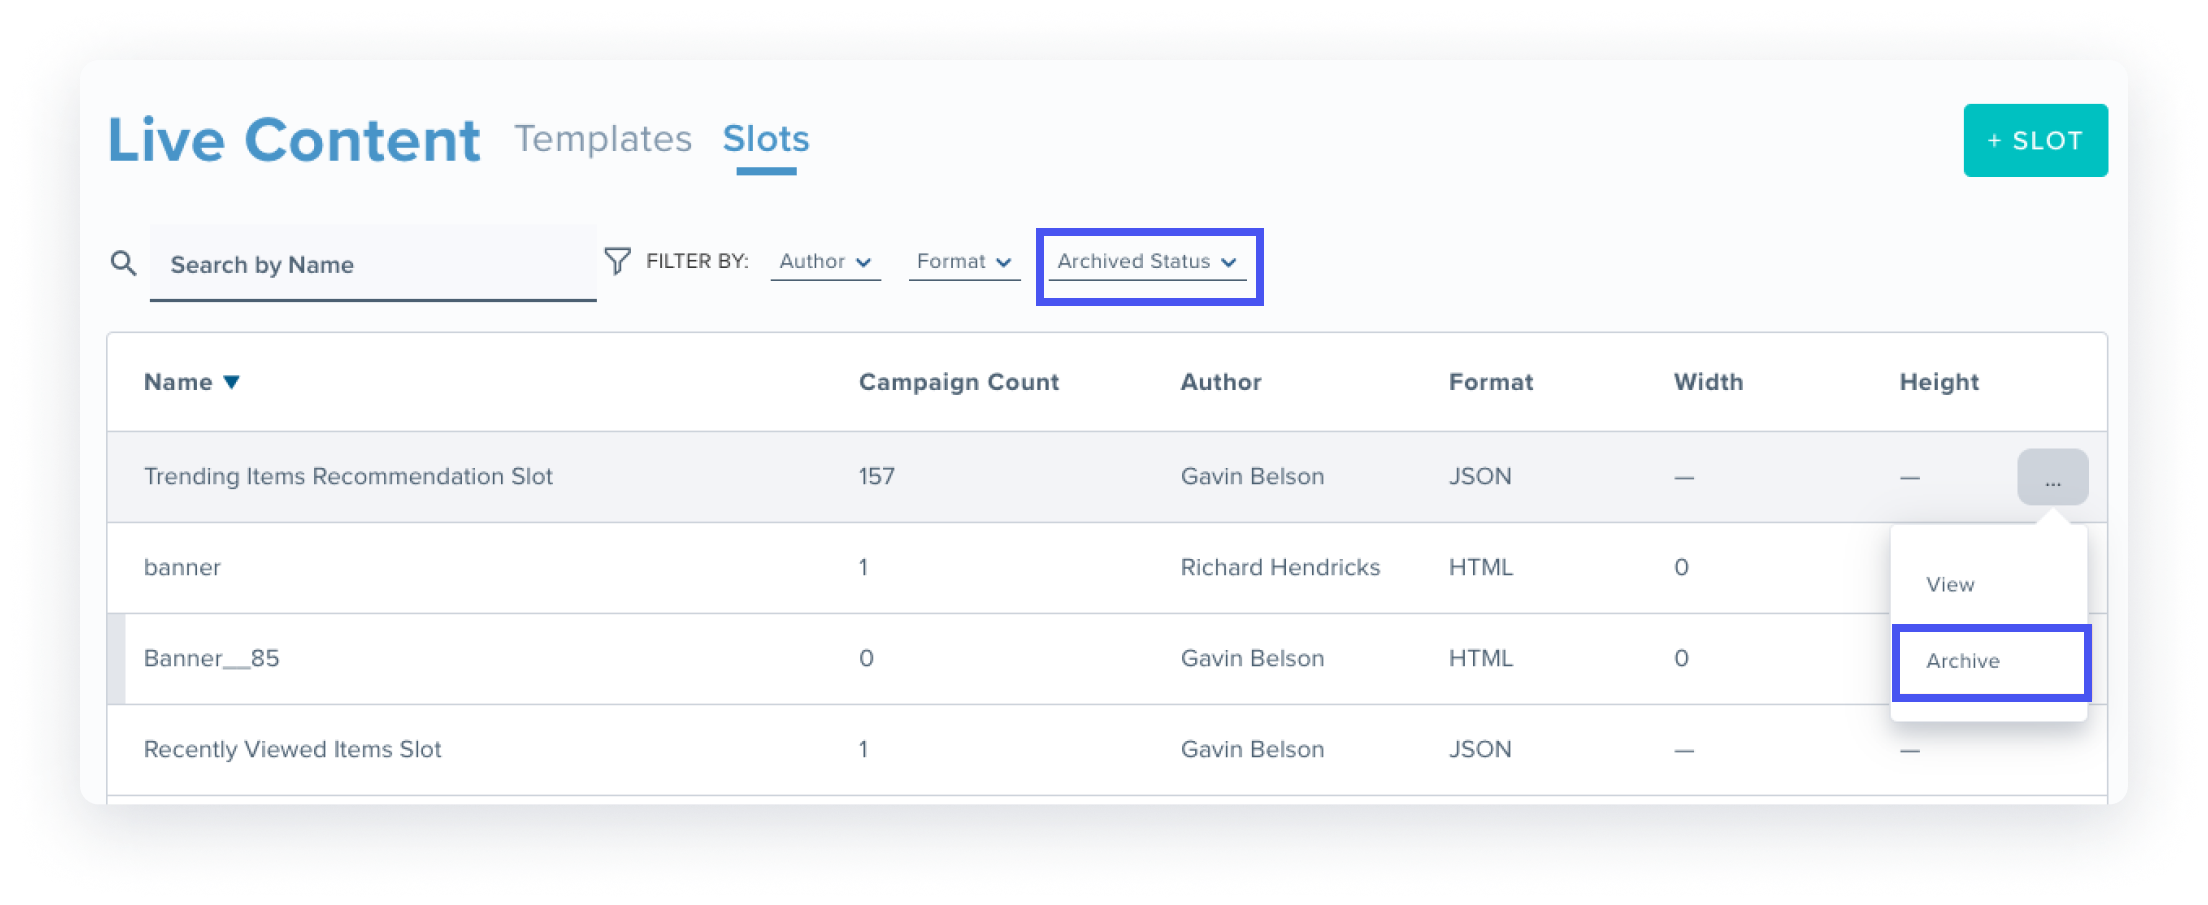
Archive Live Content Slots
You can now streamline your workspace by archiving Live Content slots that are no longer in use, making it easier to find the slots needed. Archived Live Content slots will no longer appear in the slot selector dropdown within a Live Content campaign. To archive a slot, simply click on the ‘more’ menu action for a slot on the index screen. Please note that only slots not being used by any active Live Content campaign can be archived. Archiving a slot does not delete it; you can always ‘unarchive’ an archived slot to resume using it in your Live Content campaigns.
To streamline slot management, utilize the ‘Archived Status’ filter on the Live Content slot index screen to view either ‘archived’ or ‘active’ slots.
App Install Tracking
Experience improved app tracking with our latest iOS and Android SDK releases, now featuring default support for app install and update events. When your customers download the latest version of your mobile app using the updated Blueshift SDK, it automatically triggers an app_install event. Similarly, updating the app to the latest version also triggers an app_update event for existing mobile customers. With this feature, you gain the ability to report and segment based on your customers’ app_install and app_update activities, providing valuable insights for your mobile strategy.
OneSignal App Upgrade
We have enhanced our OneSignal integration to support OneSignal’s new data model, supporting both user and device identifiers. Your current integration with OneSignal utilizes their legacy data model. To leverage the benefits of OneSignal’s new and improved data model, you’ll need to update the integration with a newer version of the Blueshift JS snippet, capturing the new identifiers introduced by OneSignal. Once updated, you can seamlessly utilize pre-built Quick Start Cloud App templates to push notifications using these identifiers to OneSignal.
We recommend upgrading your OneSignal integration to:
- Benefit from the improved data model
- Ensure continued functionality as OneSignal deprecates the legacy data model
New APIs for Customer Lists
We’ve introduced new bulk add and bulk remove API endpoints for customer lists. With these additions, you can now quickly add or remove users from a customer list in bulk, boosting efficiency in your list management.